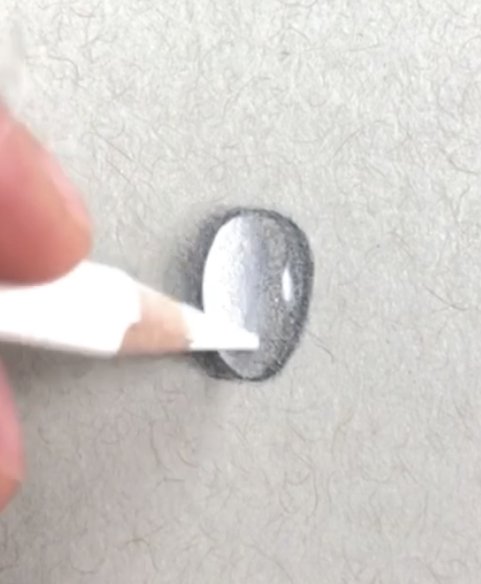
I was completely shocked at how easy it is to draw a realistic water drop. After a few attempts it was like magic turned my mere marks into a real drop of water.
This post may contain affiliate links, which means we’ll receive a commission if you purchase through my link, at no extra cost to you. Full disclosure here.
The most important thing by far when drawing a realistic water drop is the use of toned paper. This is what makes the white highlights of the drop stand out. Without toned paper, you’ll have a hard time getting it to “pop”, although it is possible.
Materials Needed
All you need is a soft graphite pencil (anywhere between 2B and 8B), a white colored pencil (I use the one from the Prismacolor set as it’s very soft), a q-tip, and toned paper.
If you don’t have toned paper you can try it on white paper and it will look pretty good. You can also lightly sketch over the part of the page you’re drawing. Then just blend it out as a sort of DIY toned paper.
If you try this DIY method, make sure to draw the outline of the drop first (very lightly) and tone around it, not inside it. This will save you a lot of headache when using the white pencil later.

Step 1: The outline
Using your graphite pencil, draw a jellybean shape as lightly as you can.
Don’t go too big with it, smaller drops always look more realistic!
You then want to bring one side of it out a bit, in a crescent moon type shape.
Remember to keep the pressure light for now.
Draw a tiny oval for the highlight in the same position as shown in the image.


Step 2: Shading the sides
Shade the right side of the drop lightly. Be careful to avoid shading the little oval you drew in for the highlight.
You should aim for a light, even tone for now, covering about half of the drop.
Then darken some of the shading on the left side, close to the edge, only shading about half of the “moon” shape from before.
Don’t darken it too much, just a bit darker than the original shape from the first step.


Step 3: Highlights
Using your white colored pencil, draw in the highlight inside the tiny oval, and highlight the inside of the drop on the left side (see images).
You want the highlight to be stronger on the left, and gradually get lighter as it meets the graphite near the center.
This is the whole key to this drawing – have the left side of the drop the whitest, and make it gradually get less white as you move towards the center.
Try to get it as gradual a fade as you can.


Step 4: Blending
Using a Q-tip, start at the center of the drop and with light to moderate pressure blend by moving in tiny circular motion.
Moving back and forth will cause a mess, it has to be circular motion to get a smooth, even finish.
Once you’re happy, go back over the left edge of the drop with your graphite pencil. This time a bit darker (but just where the shadow touches the drop, not the whole left-shaded part!)
This will be the darkest part of the drop, so make sure it’s pretty dark.


Step 5: Repeat
Your goal in general for the drop is to make it darkest at the left edge and the right edge, and gradually make that darkness blend to the left.
And it’s the same case for the highlight on the left – you want it to be the most white on the left, and then gradually get less and less white until somewhere in the middle of the drop, where it gets to the point of fading to the graphite color.
Keep swapping between darkening the dark parts, blending, whitening the white parts, blending and so on.
Soon you’ll have a perfect realistic water drop!


Final thoughts
The weird thing about doing these realistic drops is, while you’re drawnig them, and going through each step, sometimes you finish and it doesn’t seem realistic at all. But then you come back to it a few hours later and think “Wait, did I actually draw that?!”.
It’s just because while you’re drawing it, you’re going through all the tiny steps and it transforms gradually without noticing. Your brain just needs some time away from it to see it as it is.

And That’s it!
Don’t get discouraged if your first few attempts don’t turn out perfectly. It can take a bit of time to get the hang of it. It’s all about the blending for this one, and the darkening/whitening.
Just remember, the left side has a dark line that fades to the left, the right side is the same (but ignore the highlight!), and the white part on the left side is whitest where is touches the dark line, and gradually gets less white as you go towards the center.
That sounds wayyy more complicated than it is but I hope it makes sense!
Have fun!
